

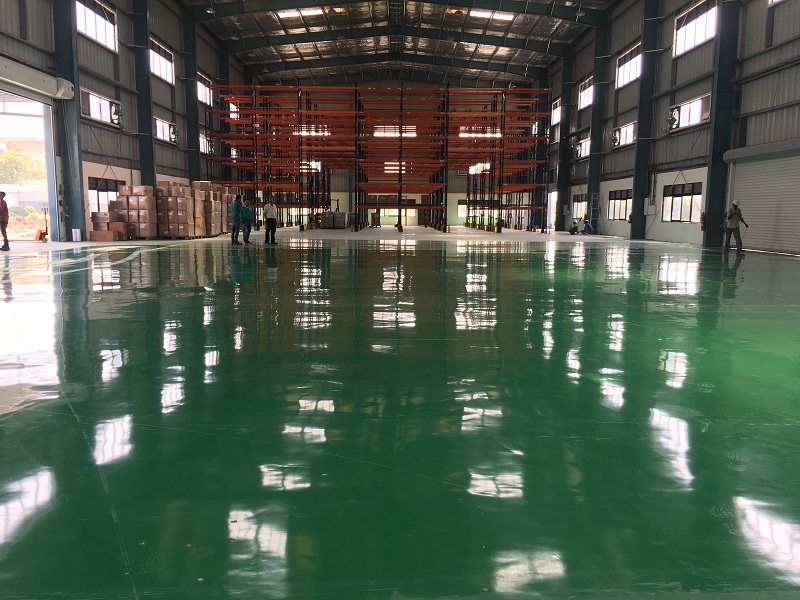
5 Easy Steps to a Durable and Functional Industrial Epoxy Floor in Pune, India
Industrial spaces demand a lot from their floors. They need to withstand heavy traffic, resist chemical spills, and be easy to maintain. An industrial epoxy floor is an ideal solution for these challenges. Not only is it incredibly durable, but it also offers a seamless, aesthetically pleasing finish.
If you’re considering installing an industrial epoxy floor in your Pune facility, this guide will walk you through the process in five easy steps. However, it’s important to remember that for optimal results, contacting a professional epoxy floor contractor like Hi-Crete Decorative Systems Pvt. Ltd. is highly recommended. Their team of experts in Pune, India (reachable at +91 91757 61991 or [email protected]) possesses the experience and equipment to ensure a flawless and long-lasting epoxy floor installation.
Step 1: Surface Preparation – The Foundation of a Great Epoxy Floor
Before diving into the application of the epoxy floor itself, meticulous surface preparation is paramount. This crucial step ensures a strong bond between the epoxy and the concrete substrate, preventing future peeling or cracking. Here’s what surface preparation typically involves:
- Removal of Existing Coatings: Any existing paint, varnish, or other coatings must be removed using mechanical grinding or scarification. This allows the epoxy to adhere directly to the concrete.
- Crack and Damage Repair: Address any cracks, holes, or uneven surfaces in the concrete. Hi-Crete Decorative Systems Pvt. Ltd. uses high-quality patching materials to ensure a smooth and level base for the epoxy.
- Moisture Control: Concrete should be free from moisture before applying the epoxy. Moisture testing is conducted to determine the moisture level, and if necessary, moisture mitigation techniques are implemented.
- Diamond Grinding: The concrete surface is then diamond grinded. This process creates a slightly rough texture that improves the adhesion of the epoxy. Additionally, diamond grinding removes any dirt, dust, or contaminants that may hinder the bonding process.
Step 2: Prime Time: Applying the Epoxy Primer
Once the surface preparation is complete, it’s time for the first layer of the industrial epoxy floor system – the primer. The primer acts as a bonding agent between the concrete and the subsequent epoxy coats. Here’s a closer look at the primer application process:
- Selection of the Right Primer: The type of primer chosen depends on the specific conditions of the concrete surface and the desired properties of the finished floor. Hi-Crete Decorative Systems Pvt. Ltd. has a wealth of experience in selecting the most suitable primer for your project.
- Application of the Primer: The primer is typically applied using a roller or squeegee, ensuring a uniform and complete coat across the entire surface.
Step 3: Building the Body: Applying the Epoxy Coat
The epoxy coat forms the core of the industrial epoxy floor system. It provides the desired strength, durability, and chemical resistance. The application process involves:
- Mixing the Epoxy: The epoxy components (resin and hardener) are mixed thoroughly according to the manufacturer’s instructions. Proper mixing ensures optimal performance of the epoxy.
- Application of the Epoxy Coat: The mixed epoxy is then applied to the primed surface using a roller or specialized equipment depending on the chosen epoxy type and project size. Hi-Crete Decorative Systems Pvt. Ltd. utilizes industry-standard application techniques to achieve a seamless and consistent finish.
Step 4: Adding Color and Character (Optional)
While industrial epoxy floors are often known for their utilitarian nature, they can also be aesthetically pleasing. Here’s where decorative options come into play:
- Color Pigments: Colored pigments can be incorporated into the epoxy to create a solid-colored floor or add decorative patterns. This can enhance the visual appeal of the space and potentially even designate specific areas within the facility.
- Quartz Chips: Quartz chips can be broadcast onto the wet epoxy to create a textured, slip-resistant surface. This option is particularly beneficial in areas prone to moisture or spills.
Step 5: Sealing the Deal: Applying the Topcoat
The final step in creating a durable industrial epoxy floor is the application of a topcoat. The topcoat provides additional protection against wear and tear, chemicals, and stains. Here’s what to expect during the topcoat application:
- Selection of the Topcoat: The type of topcoat chosen will depend on the specific needs of the space. Hi-Crete Decorative Systems Pvt. Ltd. can advise you on the most suitable topcoat for your application, considering factors like traffic volume and chemical exposure.
- Application of the Topcoat: The topcoat is typically applied using a roller or specialized equipment, ensuring a uniform and complete coverage.